How to Create a Gang Sheet

creating a gang sheet for custom transfers

A gang sheet refers to printing multiple designs on the same transfer sheet. We print on 13 x 19″ sheets and we can often print several of the same design, or different designs, on the same sheet for one price. Layouts are priced per sheet and per color, so keep in mind that all designs on the sheet must share the same color scheme.

Creating a gang sheet is the best way to utilize the 13 x 19″ area that we provide for printing custom transfers. Gang sheets are ideal when you have multiple designs (e.g., front and back) or when you have a design that you may need in more than one size.

2016-09-07_1509

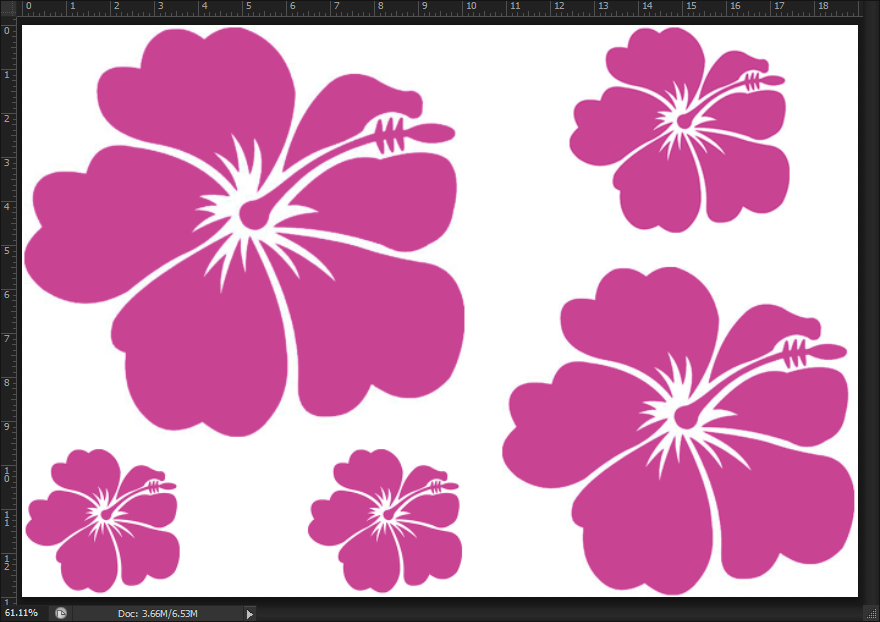
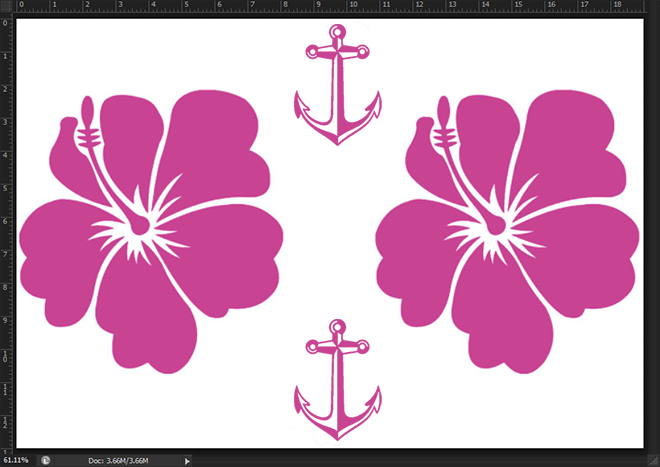
For example, let’s say this hibiscus flower is your design. Above is a layout that shows the same design in multiple sizes- which may be useful when you are pressing on adult and youth garments, and maybe you have a front and back for each shirt. Or, let’s say you have two different designs – one for the front and one for the back. Below is an idea of what it may look like if we are fitting 2 prints of each design per sheet.

2016-09-07_1504

We offer free gang sheets- meaning that when you send us your design, we will create a gang sheet similar to the above examples, with as many prints per sheet that can fit. If you have one design that you need in multiple sizes, be sure to mention that in the notes/comment section when filling out the quote form, and let us know how many prints of each size will be needed. If you have two different designs that you’d like ganged, be sure to submit separate quotes, and mention that you’d like them combined.

However, if you are able to create your own gang sheet in a program like Adobe Illustrator or Photoshop, you can get the most bang for your buck by being able to determine what is on each sheet. When creating a gang sheet, there is no limit on how close the images can be to each other. However, keep in mind that you will have to cut them apart- so you will want to leave yourself enough room to get in there with scissors. You can rotate your designs any way you’d like to make them fit best, they don’t have to be in any particular direction.

If you will be sending us a file of a layout/gang sheet that you created, be sure to input your design size as “13×19” when filling out the quote form, and your transfer quantity as the number of sheets you need printed.

For further help on creating a gang sheet, check out help videos here!

View & Add Comments

FDC Adhesive Vinyl On Canvas

Do you want to apply vinyl to canvas but are too scared to try? Well fear no more!

When one of our employees scored an oversized white canvas, she knew it needed one thing- VINYL! So we went to work testing different applications to see which would be the best vinyl/canvas method, and I’m happy to say we found one! 

apply fdc to canvas

You Need:

To start you will want to choose your design, measure your canvas, and size your design accordingly.

Send your design to your cutting machine, weed it, and apply the transfer tape.

Once you are ready to apply your vinyl you will want to spray the canvas with adhesive glue. We recommend doing this outside, or at least covering your work surface, as the glue overspray can be messy. After you spray the glue, quickly apply your vinyl, smooth it out, and peel your transfer tape.

Repeat until you are finished! Then share a photo with us on Twitter, Instagram or Facebook by tagging @proworldinc or using the #proworldinc hashtag.

But that’s not all, here are a few more tips/tricks:

– Technically, the FDC Ultra Glossy vinyl will stick to the canvas without the adhesive spray, however… the adhesive spray will make your life a lot easier when applying.

– Don’t wait too long to peel the transfer tape from your canvas… if the glue starts to set, it will leave teeny, tiny marks. No one but you will notice, but we know how much of a perfectionist you are!

View & Add Comments

Different Ways to Print a Garment

Printed t-shirts

There are many different ways to create a custom t-shirt – from different types of heat transfers to printing directly onto the garment. Today’s blog will help pinpoint what process may work best for you, depending on the type of job you will be doing.

Custom Transfers
Screen printing on special release paper using plastisol inks.

  • Best for medium to large orders (quantities: 12+)
  • Up to 10 spot colors or unlimited colors using process colors (CMYK)
  • Cotton, 50/50 blends, polyester, canvas bags, jerseys, and more
  • Can be pressed onto all colors (dark garments require a backing)
  • Up to 13″ x 19″ (This is the size of the gang sheets we print on)
  • Equipment needed:  Professional heat press

Transfer Paper
Paper that allows you to create custom designs using your inkjet or laser printer.

  • Best for small orders (quantities: 1-12)
  • Unlimited colors, except for white
  • Cotton, 50/50 blends
  • Can be pressed onto all colors. Paper options available for light or dark garments.
  • Paper available in 8.5″ x 11″  or  11″ x 17″
  • Equipment needed:  Computer, printer and professional heat press

Transfer Vinyl
Rolls of colored material that can be used with a vinyl cutter or a Silhouette.

  • Best for small to medium orders (quantities: 1-36)
  • Unlimited colors, but the suggested amount of colors that can be layered is 3 colors within 1 design
  • Various garment types depending on the vinyl being used
  • Can be pressed onto both light and dark colored garments
  • Rolls are available in 15″ widths and up. Siser Easyweed now available by the sheet.
  • Equipment needed: Computer, vinyl cutter, professional heat press

Sublimation Transfers
A process in which sublimation ink turns into a gas when heated, and embeds itself into the fibers of polyster material

  • Any size order, cost effective for small or large quantities
  • Unlimited colors
  • Limited to 100% white polyester garments
  • Can be done on 3D products with a sublimation-ready coating; such as mugs, phone cases, photo panels, coasters, puzzles, and much more
  • Various paper sizes available, up to 13″ x 19″
  • Equipment needed:  Sublimation printer, sublimation inks, sublimation paper

Direct to Garment
Direct to garment printing using water based inks and a DTG printer.

  • Best for small orders (quantities: 1-12)
  • Unlimited colors
  • Limited to cotton and cotton blends
  • Can be done on both light and dark garments
  • Various design sizes, depending on the printer
  • Equipment needed:  a DTG printer

Screen Printed
Screen printing directly on the garment using plastisol inks.

  • Best for large orders (quantities: 24+)
  • Up to 10 spot colors or unlimited colors using process colors (CMYK)
  • Various garment types, not as limited as transfers (due to heat)
  • All garment colors (dark garments require a base color)
  • Various design sizes, depending on the printer
  • Equipment needed:  Screen printing equipment

*Please note that we do not offer DTG printing or screen printing equipment.

View & Add Comments

Back To School: Monogrammed Pencil Box

My favorite part of the Back To School season is seeing all of the blank back to school supplies that are in need of some personalization! From notebooks and book bags, lunch accessories, and even “first day of school” signs… there are so many options. How does one choose where to start?

BACK TO SCHOOL

For today’s post, we decided to add some adhesive vinyl to a pencil box! You will need:

You Will Want To:

  • Measure your pencil box
  • Create your design. We went with a simple, single letter monogram and some ultra metallic stars. If you are layering your design, remember to double check your cut lines before you cut.
  • Cut and weed your design
  • Apply the transfer tape to your weeded design
  • Place it onto your pencil box, burnish, and carefully peel it off of the box
  • Admire your craftiness, you are done!

personalize your back to school supplies

Have you made any Back To School Projects yet? We would love to see them! Post them on our Facebook page or tag us on Instagram by using @proworldinc or #proworldinc


View & Add Comments

Choosing the Right Size for your Custom Transfers

Choosing the best size for custom transfers

When ordering custom transfers, you will want to make sure that you are choosing the right size for your design when filling out our quote form. We get questions from our customers all the time asking for help on sizing, so we hope that today’s post is helpful.

Popular Image Placement on T-shirts

The best way to know what size will work, is to measure the printable area of the garment(s) you will be pressing on. If you will be printing on a variety of sizes (lets say from toddler to adult XL), then you obviously may need two different size transfers printed. However, it is always best to try and print just one size for all of your transfers, to be able to gain the most value out of our gang sheets and to save money.

Measuring a transfer on a garment

We always recommend taking a ruler to measure the printable area on the smallest garment first. Find out how much room you have to work with, and plan on making that entire area your transfer size. Let’s say your printable area is 9×9″ for a full back design you want to create. Now you will want to measure out a 9×9″ area on your biggest garment to make sure that this size will take up enough room. If it works on the smallest and largest garment, it will work on all sizes in between.

rapidresponsesizeOur sizes are proportional based on width. For example, if you upload the above design and request a size of 11×11″, we will enter the width at 11″ and let the design scale out proportionately. As you can see, the above design would be only 4″ tall instead of 11″ – due to the shape of the artwork. It is much wider than it is tall.

The following table will provide some guidance on suggested transfer sizes for different types of garments, and different printing areas.

Suggested transfer sizes

*Keep in mind that your design may not be proportionate at any of these exact sizes. This is only to be used as a starting point. You will always want to measure your garments to ensure the size(s) that you choose will fit properly.


View & Add Comments

Siser EasyWeed by the Sheet

We have some exciting news!! Siser EasyWeed can now be purchased in sheets!!

sheetsmobileapps

We’ve heard your requests, so we made it happen! We are happy to announce that you can now purchase 22 colors of our most popular heat transfer vinyl in sheets! The actual size is a 12″ x 14.75″ sheet  with an acceptable variance range +/- 1/4″ on either dimension.

What is Siser EasyWeed Heat Transfer Vinyl?

Siser EasyWeed is a polyurethane, ready-to-cut heat transfer vinyl designed for custom garment decoration. Siser EasyWeed is in a league of its own because of it’s sticky pressure sensitive carrier which allows you to cut and weed small letters and fine designs very easily. Much thinner than other film materials, Siser EasyWeed is perfect for single color or multi-layered applications. Siser EasyWeed also offers excellent durability, even after repeated washings.

How can it be purchased?

You can purchase Siser EasyWeed in yards or sheets through our website – www.proworldinc.com

What’s the difference between sheets and yards?

If you are planning on creating a lot of products in one specific color, purchasing vinyl in yards will help save you money and reduce waste.

If you are increasing your vinyl assortment, making a variety of items, or making a one-off item, sheets are the way to go since you can buy a mixture of colors inexpensively.

What can you use to cut sheets of Siser EasyWeed?

All cutting machines are able to cut Siser EasyWeed. However, sheet sizes are popular for projects when using the Silhouette Portrait, Cricut and Silhouette Cameo since their cut area is 12” wide.

What colors do the Siser EasyWeed sheets come in? We currently carry 22 colors!

siser easyweed sheets


So now that you’ve heard our exciting news. We want to hear what color sheet you are most excited to try?!


View & Add Comments

Save Time on Rhinestone Stencils with Wonder Flock

Would you like to save time while creating custom REPOSITIONABLE rhinestone stencils? Now you can, with Wonder Flock!

Wonder Flock Rhinestone Template System is the most inexpensive and best-performing rhinestone template system out there.  What makes Wonder Flock such as great product is that you can reposition and customize stencils. It is static resistant so that rhinestones don’t jump, and you can create letter kits or customized layouts by repositioning stencils. The best part about Wonder Flock is that you can pull it up and reuse it again and again, and it can be stored on inexpensive wax paper.

Save Time with a re positionable rhineston template

We are using a lettering kit for today’s project.  The letters are easily repositionable. Allowing you to cut the letters and put them exactly where you want.  Making it a great way to do names because you don’t have to cut a unique stencil to achieve great results.

After you have your design exactly the way you want them, load the area with rhinestones.  Next, you need to take a microfiber sponge and just fill in all the areas.  It’s best to use a sanding motion (not a brushing motion) when filling in the rhinestones.  

After your letters and design elements are covered, steer all the rhinestones that are in the holes away from your design.  Once you get them all steered away from your design, you can use transfer film to make the transfer.  Next, just roll the transfer film over the design and use your sponge to spread the rhinestones out.  It’s so easy and it looks great!

Want to see how  Wonder Flock works? Watch the short video below!

·

Other benefits of Wonder Flock:

  •  Align closely spaced multi-color patterns with Patent Pending Smart Frame System.
  • Reduce labor with superior”weeding” of material after cutting.
  • High visibility black material creates contrast between stones and template material.
  • Static resistant fibers eliminate shifting or jumping of rhinestones.
  • Effortlessly steer ss6 rhinestones or 2mm rhinestuds into stencils with a Micro Fiber sponge.
  • Works with stone diameters from 2mm up to 6mm.
  • Costs up to 30% less than other rhinestone flock materials.
  • Does not require a “flock workstation”, the material is positioned on inexpensive plastic sheets.
  • Stones flow effortlessly into stencils, including ss6 rhinestones and 2mm rhinestuds.
  • Smart Frames Alignment System eliminates need to stack and align multicolor patterns

Would you like to learn more about Wonder Flock? Contact us for more information!

View & Add Comments

Getting Creative with Sign Vinyl

Can we just say how much we are loving the FDC sign vinyl?! This stuff is so versatile and can be used on so many different surfaces. If you think it, it can probably be vinyl-ed! You can really get creative with personalized products to offer to your clientele, which makes it a great expansion to your business. Like this mug for example, which can easily be customized for a bride, or for any other special occasion.

To work with this vinyl, all you will need is a cutter along with a few accessories. For the cutter, we used a Silhouette Cameo, but it will work with any other commercial vinyl cutter.

silhouette cutter and fdc vinyl

Along with the cutter, you’ll need a weeding tool and a squeeqee… as well as some application tape, which comes in two options:  gridded/white or gridded/clear. The clear tape is a little more expensive, but is extremely useful when trying to line up your design on the product you are applying it to, whereas the white tape has an opaque backing.

vinyl tape, weeder, squeegee

We browsed Pinterest for some inspiration and would like to share a few of our favorite ideas with you guys. (Disclaimer:  The following photos do not belong to Pro World, and have been linked back to their origin)

collage of different vinyl products

Wall decal – monogram for a baby nursery
Vinyl on wood – ‘Beach House’ sign
Vinyl on mailbox – customized with address
‘His’ and ‘Hers’ – beer mug & wine glass
Photo frame and quote wall in vinyl
‘Adventure Awaits’ – vinyl car decal
Store Hours for a business – vinyl on door
Personalized water bottle/tumbler
Customized food bowl with pet’s name

Be sure to share what you are making with us on Instagram @proworldinc!

View & Add Comments

SIMPLIFY and AUTOMATE your design process

simplify your design process

At Pro World, we strive to provide our customers with exceptional products and customer service, along with the resources to help make you successful with your custom business. Today we are proud to announce our partnership with Digital Art Solutions to make designing even easier!

Are you familiar with Digital Art Solutions?

Digital Art Solutions creates computer software and digital artwork to help anyone interested in learning how to design their own graphics within CorelDraw! Want to see how? Sign up for a webinar! At least once a month Pro World and Digital Art Solutions will host a webinar tutorial so that you can see  first hand how the different software’s can affect your business. Want to sign up for our next class? It will be held on Monday, August 1 – 4pm EDT / 3pm CDT / 2pm MDT / 1pm PDT, and we are discussing Producing Graphics for Custom Heat Transfers! Sign up by following his link.

Each software title in their product line is designed with one primary purpose: to simplify and automate both the design and the production processes. Smart Designer is a designing software that allows for crafters and business owners to take graphic design into their own hands, by providing Add-On Tools that work seamlessly with CorelDraw.

See what you can do!

Smart Designer Pro

The Smart Designer Pro software makes it possible for anyone, regardless of skill level, to produce high-quality custom graphics quickly and easily. Anyone that produces graphics relies on two basic technologies: graphic design software and digital artwork (clip art, templates, fonts, etc). However, this software combines both into a graphics system that works seamlessly with CorelDRAW.

Ready Art

The Ready Art series was designed as a tool for anyone that needs to quickly produce high-quality custom artwork for the imprinting industry without any cleanup. Each clipart image and template is specially prepared to be “production-ready” without any modification. 

Rhinestone Designer

Rhinestone Designer is an add-on software that blends in seamlessly with CorelDRAW X7 or X8. Rhinestone Designer adds over 65 design and production features to CorelDRAW that automate and simply art production for rhinestone apparel and heat applied graphics. Making it even easier for you to design Rhinestone garments!

Smart Monograms

Smart Monograms is a monogram template that works with the Smart Designer Pro Add-On software within CorelDRAW! This innovative new product line was designed to create highly profitable customized products without the hassle of working with traditional monogram fonts.

Power Pack Decals

Vinyl decals and stickers are incredibly profitable. If you want to increase your decal business, the Power Pack Kit is sure to help! The Power Pack 3 is a complete kit of tools to design, market and sell vinyl decals. The kits include editable templates, sales sheets, an order form and critical training documents for selling vinyl decals as part of a fund-raising program. Power Pack 3 is compatible with CorelDRAW X4 or higher, Rhinestone Designer and Smart Designer Pro.

View & Add Comments

DIY: Personalized Dog Treat Jar

Do you need to make a quick gift? Make a personalized dog treat jar!

DIY- A PERSONALIZEDDOG TREAT JAR

For today’s project you need:

First, design your cut file.

Second, WELD your letters together. It’s important to weld your letters so that the oultine of your name is cut. If you forget to weld your letters, your machine will cut overlapping lines, like the bottom image shows in the photo below.

DSC05587

Load your vinyl, and adjust your cut settings.

Send your design to your cutting machine, and carefully weed your design.

DSC05585

Apply the transfer tape.

DSC05589

Smooth the transfer tape onto your vinyl and gently peel the transfer tape from the backing.

DSC05592

Finally, apply the FDC vinyl to your glass jar, and smooth out any air bubbles.

DSC05594

Carefully peel the transfer tape off of the glass jar and you are done!

personaized dog trat jar


IMG_5410

View & Add Comments